Skip to content

Davin Studer

How to Collapse the Splunk Search Bar

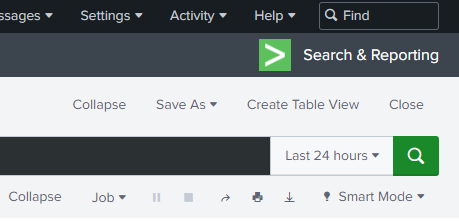
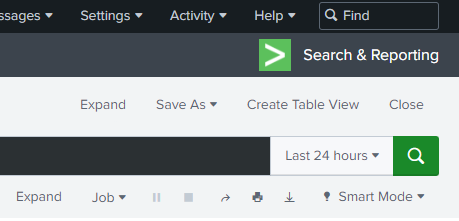
This post will be short and to the point. I use Splunk almost daily. One of the main pain points is that the search bar cannot be collapsed. I regularly have searches that are 50+ lines. The UI currently doesn’t handle this very well. You have to do a lot of scrolling to get down to the results and then more scrolling to get back to the top. It’s kind of a pain. I looked around and haven’t found anyone who has addressed this so I decided to. The below bookmarklet will create collapse buttons above and below the search bar that can be used to get back valuable screen real estate.

The buttons are pretty obvious. They expand and collapse the search bar. Also, if you click inside the search bar while it is collapsed it will automatically expand out again. There are a couple limitations. If you refresh the page you will need to click the bookmarklet again … there is nothing I can do about that. Also, as of now when you initiate a search the buttons will also go away as Splunk redraws that section of the page. I may or may not be able to do anything about that. I’ll keep looking into it. They do survive paging though the results of a search. I you find this helpful let me know.

Bookmarklet:
Splunk Search Collapser <- drag this to your bookmarks toolbar

Search Bar Expanded

Search bar expanded

Search Bar Collapsed

Search bar collapsed

The code

Here is the code for the bookmarklet in case you are curious.

var collapser = {
	state: 'expanded',
	origHeight: 0,
	init: function(){
		var t = this;
		if($('.ace-collapser').length == 0) {
			var btn = '<div class="ace-collapser pull-left"><a class="btn-pill" href="#">Collapse</a></div>';
			$('div.pull-right.jobstatus-control-grouping').prepend(btn);
			$('div.document-controls.search-actions').prepend(btn);
			$('div.ace-collapser a.btn-pill').click(function(e){
				e.preventDefault();
				t.collapseExpand();
			});
			$('pre.ace_editor').click(function(){
				t.expand();
			});
		}
	},
	collapseExpand: function(){
		var t = this;

		if(t.state == 'expanded') {
			t.collapse();
		} else {
			t.expand();
		};
	},
	collapse: function(){
		var t = this;
		t.origHeight = $('pre.ace_editor').css('height');
		$('div.ace-collapser a.btn-pill').text('Expand');
		$('pre.ace_editor').css('height','20px');
		t.state = 'collapsed';
	},
	expand: function(){
		var t = this;
		$('div.ace-collapser a.btn-pill').text('Collapse');
		$('pre.ace_editor').css('height', t.origHeight);
		t.state = 'expanded';
	}
};

collapser.init();

How to Track and Report on Splunk .conf File Changes

Have you ever wanted to know what changes have been made to your Splunk .conf files? This was somewhat painful in the past. However, with version 9 Splunk itself will monitor your conf files and track changes that are made. The changes are stored in the _configtracker index in JSON format. This is what it looks like.

Source JSON
{
  "datetime": "08-01-2022 14:06:00.516 -0700",
  "log_level": "INFO ",
  "component": "ConfigChange",
  "data": {
    "path": "/opt/splunk/etc/users/splunkadmin/user-prefs/local/user-prefs.conf",
    "action": "update",
    "modtime": "Mon Aug  1 14:06:00 2022",
    "epoch_time": "1659387960",
    "new_checksum": "0x3ea7786da36c0d80",
    "old_checksum": "0xa01003ea5c398010",
    "changes": [
      {
        "stanza": "general",
        "properties": [
          {
            "name": "tz",
            "new_value": "",
            "old_value": "America/Denver"
          }
        ]
      }
    ]
  }
}
Flattening the Events

Most of the elements of the above JSON are pretty easy to comprehend. The catch comes with the changes (line 12) and properties (line 15) elements. These can have multiple values. So, the first things we need to do is flatten the JSON such that we create an event for each property modification under each change.

index="_configtracker" sourcetype="splunk_configuration_change"
| spath output=changes path=data.changes{}
| mvexpand changes
| spath input=changes output=properties path=properties{}
| mvexpand properties
App and Change Details

Once we’ve done that we can start pulling out fields. The first ones we will pull out are the app, the conf file type (default or local), the conf file, the modification date, and the action taken (update or add). For app, conf_type, and conf_file we can get those from the data.path field. We can split it by “/” for *Nix systems or “\” for Windows systems and then work from the right to the left to with the ultimate index split being the conf file, the penultimate being the conf file type, and the anti-penultimate being the app. Yes, I wrote it that way simply so I could use the words ultimate, penultimate, and anti-penultimate. For mod_time and action we will simply rename their data fields. While we are at it we will also format the mod_time field to be in YYYY-MM-DD HH:MM:SS format for easier legibility. If that’s not more legible to you then you can leave the last line out … but then we can’t be friends.

| eval path_type = if(match('data.path', "^.+/(local|default)/.+$"), "nix", "windows")
| eval app=if(path_type=="nix", mvindex(split('data.path', "/"), -3), mvindex(split('data.path', "\\"), -3))
| eval conf_type=if(path_type=="nix", mvindex(split('data.path', "/"), -2), mvindex(split('data.path', "\\"), -2))
| eval conf_file=if(path_type=="nix", mvindex(split('data.path', "/"), -1), mvindex(split('data.path', "\\"), -1))
| rename "data.modtime" as mod_time, "data.action" as action
| eval mod_time=strftime(strptime(mod_time, "%a %b %d %H:%M:%S %Y"), "%Y-%m-%d %H:%M:%S")
The Changed Values

This next part will pull out the stanza, property name, old value, and new value from the events based on how we expanded the event to flatten out the JSON.

| spath input=changes output=stanza path=stanza
| spath input=properties output=property path=name
| spath input=properties output=old path=old_value
| spath input=properties output=new path=new_value
Filling in the Blanks

Just to make the old and and new values a bit more legible if either value is blank let’s put {BLANK} in … this make me happy.

| eval old=if((old=="" OR isnull(old)), "{BLANK}", old)
| eval new=if((new=="" OR isnull(new)), "{BLANK}", new)
Formatting the Results

Finally, let’s display the fields we’ve extracted as a table and sort it by the modification time with the newest changes being shown first.

| table mod_time, app, conf_type, conf_file, stanza, action, property, old, new
| sort -mod_time, app, conf_type, conf_file, stanza
Full SPL Search

So, that’s it! You now have an SPL search that you can use to see how your conf files have changed over time. You can save this as a report, create an alert whenever a default conf file is modified, or you could use lines 1-16 as a base search in an accelerated data model. There are so many options! Hope this is helpful to you.

index="_configtracker" sourcetype="splunk_configuration_change"
| spath output=changes path=data.changes{}
| mvexpand changes
| spath input=changes output=properties path=properties{}
| mvexpand properties
| eval path_type = if(match('data.path', "^.+/(local|default)/.+$"), "nix", "windows")
| eval app=if(path_type=="nix", mvindex(split('data.path', "/"), -3), mvindex(split('data.path', "\\"), -3))
| eval conf_type=if(path_type=="nix", mvindex(split('data.path', "/"), -2), mvindex(split('data.path', "\\"), -2))
| eval conf_file=if(path_type=="nix", mvindex(split('data.path', "/"), -1), mvindex(split('data.path', "\\"), -1))
| rename "data.modtime" as mod_time, "data.action" as action
| eval mod_time=strftime(strptime(mod_time, "%a %b %d %H:%M:%S %Y"), "%Y-%m-%d %H:%M:%S")
| spath input=changes output=stanza path=stanza
| spath input=properties output=property path=name
| spath input=properties output=old path=old_value
| spath input=properties output=new path=new_value
| eval old=if((old=="" OR isnull(old)), "{BLANK}", old)
| eval new=if((new=="" OR isnull(new)), "{BLANK}", new)
| table mod_time, app, conf_type, conf_file, stanza, action, property, old, new
| sort -mod_time, app, conf_type, conf_file, stanza

SQL Server Parallel Index Defragmentation

I work for a company that has a pretty large SQL database. It’s about 4 terabytes in size. We had been using Ola Hallengren’s index maintenance script for a while but it got to be such that the script would take over 24 hours to run. That became a problem. That’s not to say there was really anything wrong with Ola’s script. It really is an excellent solution. However, it does only do index defragmentation serially … meaning one at a time. The same would be true for SQL Server Maintenance Plans. It works fine on smaller databases but when you have a HUGE database that no longer works well.

To solve this I created multiple jobs using his script and tried to break up the indexes between the jobs to have somewhat of a balance between them. That became a pretty big hassle to maintain. I would have to every-once-in-a-while go in and tweak it and some days it would work fine and other days it would not. So, I set out to see if anyone had created a solution to defragment indexes in parallel … meaning more than one at a time. I could not find one on the web so I built my own.

My solution will create a SQL Agent controller job and multiple worker jobs. The controller job will create a queue of indexes to be defragmented based on runtime parameters passed to it. Once the queue is created it will spawn the worker jobs which will proceed to take indexes off the queue until the queue is depleted or the termination window has expired.

The below table shows the performance gains we were able to get with our index defragmentation. Just using one job with Ola’s script took over 24 hours. When we broke it out into four jobs it still took 6-8 hours. With my script and six worker jobs the time went down to 3 hours for most all the indexes. There are two REALLY big indexes that take about 7 and 4 hours individually because the data in the table changes a lot daily. Finally, I realized that most of the indexes were set to a fill factor of 100%. Which means that I was constantly having high fragmentation on tables. So, I rebuilt all the indexes at 85% fill factor and the defragmentation time went down to about an hour per day with those two other indexes still being the outliers. I feel like that is a pretty good result.

ScriptJobs Duration
Ola Hallengren’s script1Over 24 hours
Ola Hallengren’s script46-8 hours
My script63 hours with 1 index at 7 hours and 1 at 4 hours
My script with fill factor at 85%6Monday: 1 hour (30 minutes of that is to build the queue) Other Days: 20 minutes (15 minutes of that is to build the queue)

The maintenance solution is release under the MIT License so feel free to use it as you wish just please let me know if you have found it to be helpful. You can click the button below to download the solution. The second link is to the source code repository.

https://bitbucket.org/davinstuder/index-maintenance/

Release Notes

1.3.1 – Added a check to see if the index can be defragmented online or not. Added start and end logging to the controller stored procedure. Fixed an issue with error logging not saving the error details
1.3.0 – Worker jobs are no longer statically created. They are spawned at runtime dynamically by the controller job. Cleaned up some SQL to standardize on formatting.
1.2.0 – Added history cleanup
1.0.2 – Removed references to deprecated master.dbo.UpdateIndexesQueueHistory table
1.0.1 – Edited query to find highest compatibility level for server
1.0.0 – Initial release

Twas the Night Before Passover

When I was a student at Multnomah we had to do a final project for our Pentateuch class. I wrote this. I found it the other day as I was going through our filing cabinet and pulled it out to read to the kids for Passover. Enjoy!

Twas the night before Passover, when all throughout Israel’s foe
Not a creature was stirring, not even Pharaoh.
The Hebrews painted blood on their doorframes with care,
In hopes that the Spirit wouldn’t stop there.
The Egyptians were nestled all snug in their beds,
While visions of pyramids danced in their heads.
And Moses was sitting and talking with God,
About all the things he done with his rod.
Nine plagues he had brought on the land with a clatter,
But Pharaoh still didn’t know what was the matter.
Away he sent Moses each time with a flash,
Oblivious that again with God he would clash.
More rapid than eagles his curses they came,
And he whistled and shouted and called them by name.
Now, blood! Now, frogs! Now, gnats! And, flies!
Dead livestock! Boils! Hail! Some locusts! Dark Skies!
The tenth one reserved for the firstborn to fall,
God dashed away, dashed away, dashed away them all.
As dry leaves that before the wild hurricane fly,
All the nation of Egypt started to cry.
So, up from the houses the curses they flew,
At all of the Hebrews who’d known what to do.
In the twinkling of twilight they slaughtered a lamb,
Then cooked as commanded from the the Great I AM.
They ate with their cloaks tucked in at their waist,
And as God had commanded they did this with haste.
The bread that they ate couldn’t have any yeast,
If it did, it would certainly spoil the feast.
And bundles of gold and silver they pillaged,
Cause God made them favorable to all in the village.
Now Pharaoh was pondering “What should I do?”
“Cause if they don’t leave, I could die too.”
So he bid all the Hebrews and Moses to part,
But wouldn’t you know it God hardened his heart (again).
He sprang to his chariot, to his team gave a whistle,
Then his army flew like the down of a thistle.
They chased them until the Red Sea they arrived,
But Moses had parted the sea on both sides.
The Hebrews, they crossed the Red Sea without trouble,
So Pharaoh decided to try on the double.
He started to cross the Red Sea with his troops,
But then toward the middle looked up and said “Oops!”
The waters they started to tumble and fall,
Not one man survived, not one man at all.
Then Moses exclaimed, ere they walked toward the land,
“To God be the glory, we were saved by His hand.”

A row of old books

How to Download Your OverDrive History in CSV Format

The Background

As a family we read a ton. I started reading to my kids nightly when they were young and to this day we still have story time almost every night. It is a highlight of our family time together. As a result, my kids also love to read. This became an issue when we found ourselves visiting the library multiple times a week to get more books for my son. So, eventually we just started maxing out our library card. It was not unusual for us to have 50 books checked out. That, however, brings its own set of issues. When you have to return the books it can be a challenge to find them all!

Then we found out that our library partners with OverDrive and we can get books for our kids in e-book format with the click of a few buttons. (You should be hearing Handel’s Messiah playing in your head right now) Our world changed forever. Gone were the multiple trips to the library or searching high and low for missing books.

After much research we found out that we could get Amazon Fire tablets for our kids to use as e-readers (strictly e-readers) and we could load them up with e-books. Many of the books on OverDrive will let you check them out in Kindle format. Then, you simply use Amazon’s parent dashboard and you can share the selected Kindle books to your child’s tablet. It’s a bit of a wonky process, but it works pretty well. Now, we have a different issue entirely. Our kids are flying through books like crazy and I’m constantly researching for new series. Oh well, I guess it’s a good problem to have.

Downloading the history

Well, the other day I wanted to get the history of all the books we have checked out with OverDrive. To my dismay, there was not a way to do this. But, hey I’m a programmer! I can do hard things. So, I decided to work something up. At first I thought I was going to have to screen scrape the data from the OverDrive history page and programmatically next through every history page to compile it all. But then I noticed that when I clicked between the pages of history that the screen did not refresh, which suggested to me that a web service was being called. Voila! After looking through the networking calls being made by OverDrive I discovered their REST API and found out it is pretty easy to use and has a ton of information. So I set to work and here is the fruit of my labor. It is a browser bookmarklet. Simply drag the link below to your web browser’s bookmarks bar to create the bookmarklet. Then, when you are on your OverDrive history page click the bookmarklet. It will download all your history data and compile it into a CSV file that you can open in Excel or any other similar program. I hope it works well for you. Please leave a comment if you find it to be useful.

Bookmarklet:
Download OverDrive History <- drag this to your bookmarks toolbar

The code

Here is the code for the bookmarklet in case you are curious.

var OverDriveHistory = {
	baseURL: window.location.origin,
	restURL: '/rest/readingHistory?page={0}&perPage={1}&sortBy={2}',
	header: 'Title,Sub Title,Author,Series,Publisher,Publish Date,Star Rating,Star Rating Count,Maturity Level,ISBN,Cover Art URL,Borrow Date,Type',
	csv: '',
	currentPage: 1,
	lastPage: -1,
	totalItems: -1,
	pageSize: 100,
	sortBy: '',
	error: false,
	init: function(){
		var t = this;
		if(t.isOverDriveHistoryPage()) {
			if(typeof jQuery == 'undefined') {
				t.getJavaScript('//code.jquery.com/jquery-latest.min.js', function(){
					t.start();
				});
			} else {
				t.start();
			}
		} else {
			alert('Please run this bookmarklet from your OverDrive history page.');
		}
	},
	start: function(){
		var t = this;
		var url = t.baseURL + t.restURL.replace(/\{0\}/g, '1').replace(/\{1\}/g, t.pageSize).replace(/\{2\}/g, t.sortBy);
		
		t.sortBy = jQuery('.AccountSortOptions-sort').val();
		t.showOverlay();
		
		jQuery.ajax({
			url: url
		})
		.done(function(data) {
			t.lastPage = data.links.last.page;
			t.totalItems = data.totalItems;
			t.csv += t.header + '\r\n';
			t.getData();
		})
		.fail(function() {
			t.error = true;
			t.finalize();
		});
	},
	getJavaScript: function(url, success){
		var script = document.createElement('script');
		var head = document.getElementsByTagName('head')[0];
		var done = false;
		
		script.src = url;
		script.onload = script.onreadystatechange = function(){
			if(!done && (!this.readyState || this.readyState == 'loaded' || this.readyState == 'complete')) {
				done = true;
				success();
				script.onload = script.onreadystatechange = null;
				head.removeChild(script);
			}
		};

		head.appendChild(script);
	},
	isOverDriveHistoryPage: function(){
		return window.location.href.toLowerCase().indexOf('overdrive.com/account/history') == -1 ? false : true;
	},
	getData: function(){
		var t = this;
		var url  = '';
		var progress = '';

		if (t.currentPage == t.lastPage + 1) {
			t.finalize();
		} else {
			//Set progress
			if (t.currentPage != t.lastPage) {
				progress = (((t.currentPage * t.pageSize) - t.pageSize) + 1) + '-' + (t.currentPage * t.pageSize) + ' of ' + t.totalItems;
			} else {
				progress = (((t.currentPage * t.pageSize) - t.pageSize) + 1) + '-' + t.totalItems + ' of ' + t.totalItems;
			}
			jQuery('#history-fetch-progress').text(progress);

			url = t.baseURL + t.restURL.replace(/\{0\}/g, t.currentPage).replace(/\{1\}/g, t.pageSize).replace(/\{2\}/g, t.sortBy);
			jQuery.ajax({
				url: url
			})
			.done(function(data) {
				var isbn = '';
				for(var i = 0; i <data.items.length; i++){
					isbn = '';
					for (var x = 0; x < data.items[i].formats.length; x++) {
						if(typeof data.items[i].formats[x].isbn != 'undefined'){
							isbn = data.items[i].formats[x].isbn;
							break;
						}
					}
					
					//Title,Sub Title,Author,Series,Publisher,Publish Date,Star Rating,Star Rating Count,Maturity Level,ISBN,Cover Art URL,Borrow Date,Type
					t.csv += t.escapeCSV(data.items[i].title) + ','
					+ t.escapeCSV(data.items[i].subtitle) + ','
					+ t.escapeCSV(data.items[i].firstCreatorName) + ','
					+ t.escapeCSV(data.items[i].series) + ','
					+ t.escapeCSV(data.items[i].publisher.name) + ','
					+ t.escapeCSV(data.items[i].publishDate) + ','
					+ t.escapeCSV(data.items[i].starRating) + ','
					+ t.escapeCSV(data.items[i].starRatingCount) + ','
					+ t.escapeCSV(data.items[i].ratings.maturityLevel.name) + ','
					+ t.escapeCSV(isbn) + ','
					+ t.escapeCSV(data.items[i].covers.cover510Wide.href) + ','
					+ t.escapeCSV(data.items[i].historyAddDate) + ','
					+ t.escapeCSV(data.items[i].type.name)
					+ '\r\n';
				}

				t.currentPage += 1;
				t.getData();
			})
			.fail(function() {
				t.error = true;
				t.finalize();
			});
		}
	},
	escapeCSV: function(value){
		var t = this;
		var newValue = value;
		
		if(!newValue){
			newValue = "";
		} else {
			newValue = newValue.toString();
		}
		
		if(newValue.indexOf('"') != -1 || newValue.indexOf(',') != -1 || newValue.indexOf('\r') != -1 || newValue.indexOf('\n') != -1){
			newValue = '"' + newValue.replace(/"/g,'""') + '"';
		}
		
		return newValue;
	},
	showOverlay: function(){
		var t = this;
		var html = '';
		var progress = '';
		
		progress = 'initializing';

		html = '<div id="history-fetch-overlay" style="position: fixed;width: 100%;height: 100%;top: 0;left: 0;right: 0;bottom: 0;background-color: rgba(0,0,0,0.5);z-index: 1000;"><div style="position: absolute;top: 50%;left: 50%;transform: translate(-50%,-50%);color: white;text-align:center;"><div style="font-size: 50px;">Fetching data. Please wait.</div><div id="history-fetch-progress" style="font-size: 30px;">' + progress + '</div></div></div>';
		
		jQuery('body').append(html);
	},
	removeOverlay: function(){
		jQuery('#history-fetch-overlay').remove();
	},
	finalize: function(){
		var t = this;
		if(!t.error) {
			var fileName = "OverDriveHistory.csv";

			if (window.navigator.msSaveOrOpenBlob){
				// IE 10+
				var blob = new Blob([decodeURIComponent(encodeURI(t.csv))], {
					type: 'text/plain;charset=utf-8'
				});
				window.navigator.msSaveBlob(blob, fileName);
			} else {
				var pom = document.createElement('a');
				pom.setAttribute('href', 'data:text/plain;charset=utf-8,' + encodeURIComponent(t.csv));
				pom.setAttribute('download', fileName);
				document.body.appendChild(pom);
				pom.click();
				document.body.removeChild(pom);
			}
		} else {
			alert('Something went wrong. Please try again.');
		}
		
		t.removeOverlay();
	}
};

OverDriveHistory.init();

Update

2/21/2022 – Added publication type and download progress
3/22/2021 – Initial creation

Amazing Vanishing Lego Wall

My son, who loves Lego, built a pretty awesome creation the other day. It is a super cool cave scene with a hidden surprise … a vanishing wall. He designed and built it all himself and I was so impressed I just had to upload a video of it.

Using SQL to Query up Your Agent Job Run History

It is important to keep an eye on the run history of your agent jobs. That way you are aware if your jobs fail or the time they take to run is starting to creep upward. Ultimately, you should at the very least have email notifications sent to tell you if your jobs fail. However, what if a job that used to take one hour to run is now taking 10 hours? How will you know this is happening if the job doesn’t actually fail? The only way is to make sure you are keeping an eye on it, but that can be cumbersome with SQL Server Management Studio. One beef I have with SSMS is that it tells you the time your job started and how long it took, but to get the end time you have to do the math. Ugh! The below SQL will give you the run history of your jobs with a start and end time! Woo hoo! No more date/time math. It will also give you the duration hours, minutes, and seconds in separate columns so you can easily see trends in the time your jobs take to run. I hope you find it helpful.

use msdb

select
	J.name,
	dbo.agent_datetime(H.run_date, H.run_time) start_time,
	DATEADD(second, run_duration%100, DATEADD(minute, run_duration/100%100, DATEADD(hour, run_duration/10000, dbo.agent_datetime(H.run_date, H.run_time)))) end_time,
	run_duration/10000 duration_hours,
	run_duration/100%100 duration_minutes,
	run_duration%100 duration_seconds,
	case
		when H.run_status = 0 then 'Failed'
		when H.run_status = 1 then 'Succeeded'
		when H.run_status = 2 then 'Retry'
		when H.run_status = 3 then 'Canceled'
		when H.run_status = 4 then 'In Progress'
	end run_status,
	H.message
from msdb.dbo.sysjobs J
inner join msdb.dbo.sysjobhistory H on J.job_id = H.job_id
where step_id = 0
order by
	J.name, start_time desc

Using SQL to Query up Your Agent Job Details

If you are a SQL DB admin the odds are you have a bunch of SQL agent jobs that run throughout the day. If you haven’t yet, at some point you will want to audit the specifics of those jobs and when they are running. The below script will query up the schedule details of your SQL Agent jobs. The script will also suggest SQL to change the job owner and schedule owner of any of your jobs/schedules that are owned by user logins. If you’ve not been bit by that in the past it is important to note that if a user login owns a job and that login is removed or denied access to connect to the database engine the job will cease to run correctly. Thus, I recommend setting the owner for all your jobs to “sa” to make sure that your jobs continue to run in perpetuity.

use msdb

select
	J.job_id,
	J.name 'job_name',
	case 
		when J.notify_level_email = '0' then 'Never'
		when J.notify_level_email = '1' then 'When the job succeeds'
		when J.notify_level_email = '2' then 'When the job fails'
		when J.notify_level_email = '3' then 'Whenever the job completes (regardless of the job outcome)'
		else cast(J.notify_level_email as varchar)
	end notify_level_email,
	O.name 'notify_name',
	O.email_address 'notify_email_address',
	SUSER_SNAME(J.owner_sid) 'job_owner',
	case
		when SUSER_SNAME(J.owner_sid) <> 'sa' and SUSER_SNAME(J.owner_sid) not like '##%' then 'exec dbo.sp_update_job @job_id=''' + cast(J.job_id as varchar(255)) + ''', @owner_login_name = ''sa'''
	end as job_owner_fix,
	J.enabled 'job_enabled',
	S.schedule_id,
	S.name 'schedule_name',
	S.enabled 'schedule_enabled',
	SUSER_SNAME(S.owner_sid) 'schedule_owner',
	case
		when SUSER_SNAME(S.owner_sid) <> 'sa' and SUSER_SNAME(S.owner_sid) not like '##%' then 'exec dbo.sp_update_schedule @schedule_id=' + cast(S.schedule_id as varchar) + ', @owner_login_name = ''sa'''
	end as schedule_owner_fix,
	case
		when S.freq_type = 1 then 'Once'
		when S.freq_type = 4 then 'Daily'
		when S.freq_type = 8 then 'Weekly'
		when S.freq_type = 16 then 'Monthly'
		when S.freq_type = 32 then 'Monthly relative'
		when S.freq_type = 64 then 'When SQLServer Agent starts'
	end frequency,
	left(convert(varchar, dbo.agent_datetime('19000101', S.active_start_time), 114), 8) start_time,
	case
		when S.freq_subday_interval = 0 then null
		else left(convert(varchar, dbo.agent_datetime('19000101', S.active_end_time), 114), 8)
	end end_time,
	case
		when S.freq_subday_interval = 0 then 'Once'
		else cast('Every ' + right(S.freq_subday_interval, 2) + ' ' +
			case
				when S.freq_subday_type = 1 then 'Once'
				when S.freq_subday_type = 4 then 'Minutes'
				when S.freq_subday_type = 8 then 'Hours'
			end as char(16))
	end as 'sub_frequency',
	case
		when S.freq_type = 8 and S.freq_interval & 1 = 1 then 'x'
		else null
	end sunday,
	case
		when S.freq_type = 8 and S.freq_interval & 2 = 2 then 'x'
		else null
	end monday,
	case
		when S.freq_type = 8 and S.freq_interval & 4 = 4 then 'x'
		else null
	end tuesday,
	case
		when S.freq_type = 8 and S.freq_interval & 8 = 8 then 'x'
		else null
	end wednesday,
	case
		when S.freq_type = 8 and S.freq_interval & 16 = 16 then 'x'
		else null
	end thursday,
	case
		when S.freq_type = 8 and S.freq_interval & 32 = 32 then 'x'
		else null
	end friday,
	case
		when S.freq_type = 8 and S.freq_interval & 64 = 64 then 'x'
		else null
	end saturday,
	convert(varchar, dbo.agent_datetime(S.active_start_date, '000000000'), 101) duration_start,
	case
		when S.active_end_date = '99991231' then null
		else convert(varchar, dbo.agent_datetime(S.active_end_date, '000000000'), 101)
	end duration_end
from msdb.dbo.sysjobs J
left outer join msdb.dbo.sysoperators O on J.notify_email_operator_id = O.id
left outer join msdb.dbo.sysjobschedules JS on J.job_id = JS.job_id
left outer join msdb.dbo.sysschedules S on JS.schedule_id = S.schedule_id
order by
	J.name

Confluence Nested Macro Highlighter

Have you ever clicked edit on a Confluence page only to be presented with a screen that more or less looks like a jail cell with nested macro upon nested macro in a maze of indistinguishable grey borders? Cold sweats ensue as you realize you need to pick the correct spot to add your new content and if you pick the wrong spot the fate of the whole company … possibly the world could be placed in peril. So you fall back to your training. You place your finger on your screen making sure to keep it steady Then you slowly scroll the page following the line down the page till you hit the bottom of the macro. Making sure not to move that finger off the screen you move the mouser pointer just below bottom border and click. Cursor placed. You sigh with relief. Finally, you pull out a wet napkin and clean the finger print smudge off your screen. You’ve just prevented another catastrophe and the world will continue to turn for another day.

Seriously! You’ve never experienced that? Huh!? Ok, well maybe I’m the only person that happens to. However, I can bet you’ve still seen a Confluence page with LOTS of macros and gotten confused as to which was which.

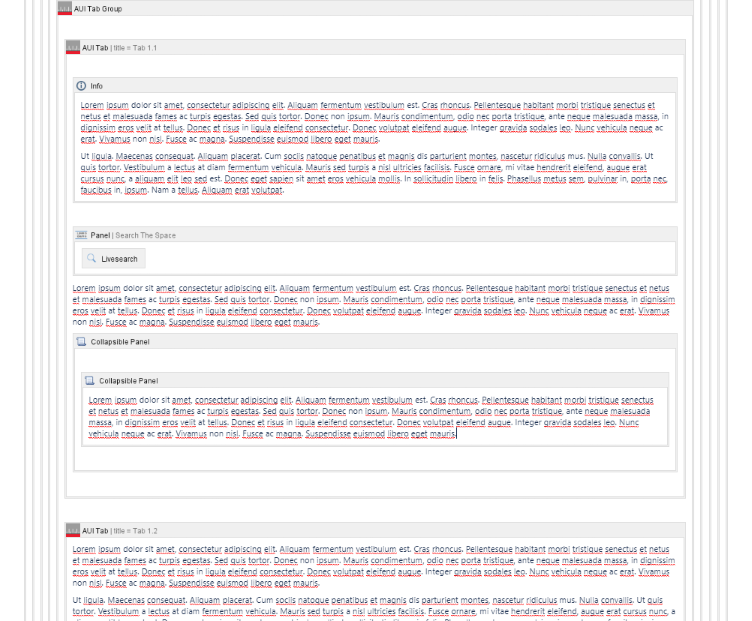
That is the inspiration for this browser bookmarklet. Simply drag the below bookmarklet link to your browser’s bookmarks bar. When you are in edit mode you can click the bookmarklet to change the borders of your macros from this …

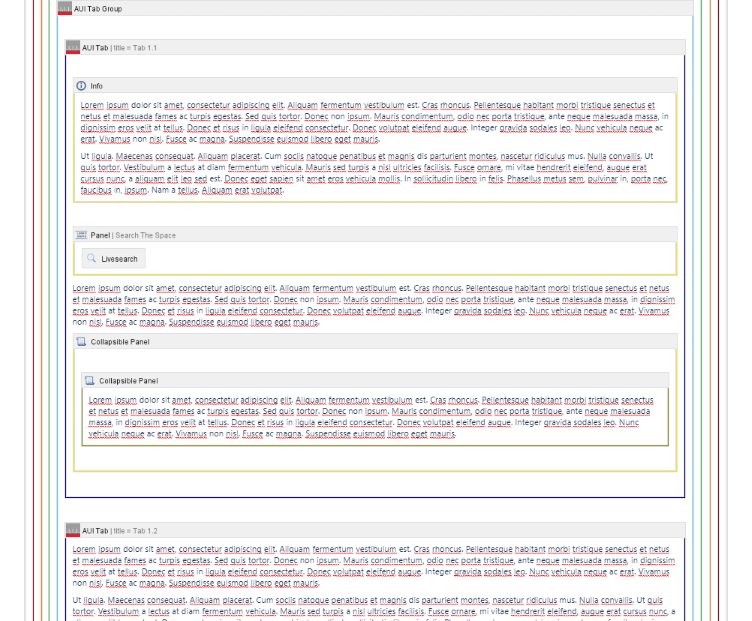
to this …

Each macro now has a distinctive color making it easy to see which border goes with which macro. Problem solved! Unfortunately, I could not change the color of the macro header. It’s actually a dynamically generated image that is LONG with the grey color hard-coded into it. Also, I tried hard to make sure that each color is distinct from the colors next to it so that it is easy to see which is which. I even thought about color-deficient people with the color choices … as I myself am red/green color-deficient. 🙂 Hope it is helpful. Let me know if you use it and it has helped you.

Bookmarklet:
Nested Macro Highlighter <- drag this to your bookmarks toolbar

If you would like to change out the colors or add more nesting levels the below JavaScript is the code for the bookmarklet. Just change/add values to the colors array to fit your needs. Once you’ve done that you can use a site like Bookmarklet Maker to turn it into your own personalized bookmarklet.

// Add/Change the hex color values to add more levels of nesting or choose different colors.
var colors = ['#800000','#F58231','#3CB44B','#42D4F4','#000075','#FFE119','#808000','#469990','#911EB4','#FFD8B1','#E6BEFF','#9A6324','#FABEBE','#000000'];

// Don't edit past this line
var styles = '';
for (var i = 0; i < colors.length; i++) {
	styles += '.wiki-content table.wysiwyg-macro table.wysiwyg-macro';
	for (var x = 0; x < i; x++) {
		styles += ' table.wysiwyg-macro';
	}
	styles += ' {\n';
	styles += '    background-color: ' + colors[i] + ';\n';
	styles += '}\n';
}
AJS.$('iframe').contents().find('head').append($('<style type="text/css">' + styles + '</style>'));

FUME – A Better Confluence User Macro Editor

One of the best and most overlooked aspects of Confluence, both by Atlassian and Confluence administrators, is user macros. There are so many useful scenarios for user macros. Here are some:

  • Templated snippets
  • Overriding built in macros example with task list report
  • Quickly creating your own macros
  • Inserting arbitrary html/css/javascript into a page without having to enabled the html macro

However, there are some big usability issues with the user macro editor. First it’s super easy to accidentally delete one. The delete link is right next to the edit link and seriously, there is no confirmation on the delete link. It’s just gone. Ack!

Second, the link to create new user macros is at the bottom of the page. If you have more that what can fit on a screen you have to scroll down to get to the link to create a new one … this just gets worse over time as you create more.

Third, the template box in the editor is just a plain old text area … no line numbers, not syntax highlighting, it’s not even a mono-spaced font! Grr!

Fourth, the cancel button doesn’t ask you to confirm canceling the edit if you have made changes to the user macro and since it sits right next to the save button it’s easy to miss. Hope you can recreate your work quickly.

Finally, every time you save it kicks you back to the list page. So, if you want to make some changes and try it out on a page you have to click back into the editor every time you save and whoops you accidentally just clicked delete instead of edit! There goes all that work.

So, without further ado … FUME. Fantastic user macro editor. The fantastic part is really just because I needed a word that ended in “ume” and that was the only word I could think of. Really it’s not all that fantastic … maybe just great, but gume isn’t even a word. Then I thought “How about  great looking user macro editor”, but that would be glume and … well … yeah, that kinda defeats the purpose. So, FUME it is. All in all I think it is a much better editing experience than the default setup. Here are some of the features:

  • Copy that “Create a User Macro” link to the top of the list page … no more scrolling
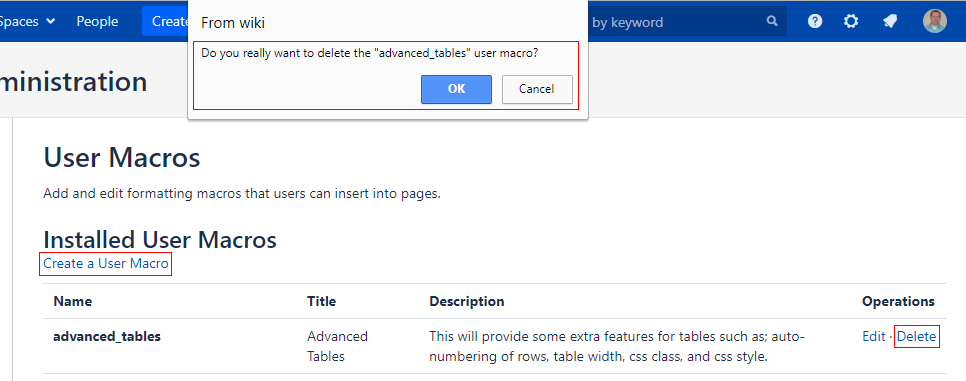
  • Delete confirmation on the list page
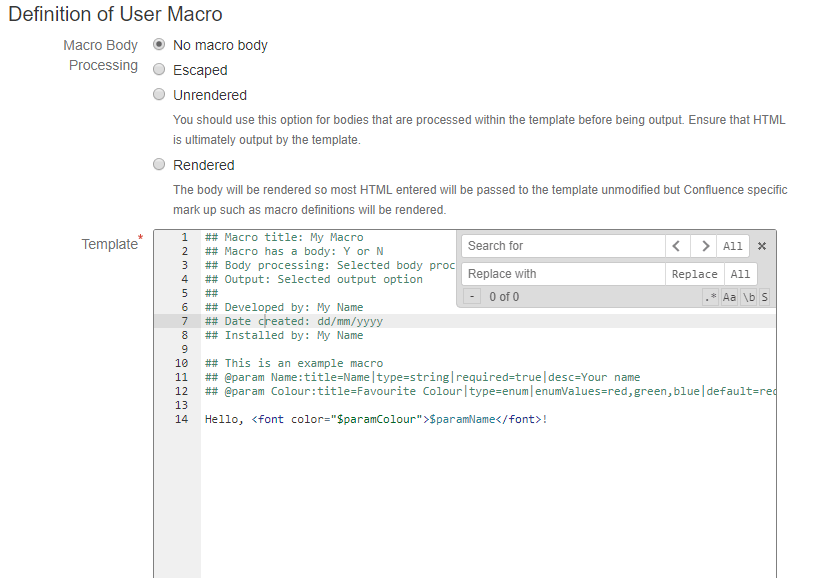
  • Template box changed to a source code editor with (Ace editor):
    • monospaced font
    • line numbers
    • syntax highlighting
    • find and replace
    • code folding
    • column select
  • Confirmation on cancelling edits of the user macro if the template has been changed
  • Asynchronous user macro saves
  • It will do your dishes and laundry … ok, not quite yet

Update 4/9/2018:

Ignore the “How to Setup” section below. I’ll leave it there, however, for the sake of continuity. I decided to package this up as an add-on in the Atlassian Marketplace. I named it Enhanced User Macro Editor (EUME … pronounced you-me … it’s a stretch I know). It seemed a bit more humble of a name and is more descriptive of what it is. I hope it is as useful for you as it has been for me. Marketplace link below.

Enhanced User Macro Editor

How to Setup

  • Download these CSS and Javascript files. (right click the links and choose “Save link as”)
  • Place them on a web server where they will be web accessible to your user macro editors.
  • Add this to the end of Confluence Admin -> Custom HTML -> At end of the BODY
<!--
*****************************************
* Fantastic User Macro Editor           * *****************************************
-->
<link rel="stylesheet" type="text/css" href="http(s)://{your server}/path/to/fume.css">
<script src="http(s)://{your server}/path/to/fume.js" type="text/javascript"></script>
  • Enjoy editing your user macros.  🙂

Screenshots

User Macro List

User Macro List Page

User Macro Template Editor

User Macro Template Editor